Showing posts with label howto. Show all posts

Wednesday, 7 November 2012

How to export the result of ping command

crackthesecurity | 06:38 | | | | Be the first to comment!

Step 1

Open the command prompt WINDOWS + R

Step 2

Type the following command C:\>ping nameofwebsite.com >> c:\Test.txt -t
For example if you want to ping google.com
C:\>ping google.com/>> c:\Test.txt -t
Read More...


How to get The ip Address of your Victim

crackthesecurity | 06:20 | | Be the first to comment!

Step 1

Create a free hosting site from here My3gb

Step 2

Copy below php code and paste in notepad and save it as ip.php

<?php
$myFile = "ip.html";
$fh = fopen($myFile, 'a+') or die("can't open file");
$stringData ="Date:".date('Y-m-d H:i:s')."<br/>Ip:".$_SERVER['REMOTE_ADDR']."<br/>Browser:".$_SERVER['HTTP_USER_AGENT']."<br />\n" ;
fwrite($fh, $stringData);
fclose($fh);
?>
<?php
header( 'Location: http://crackthesec.blogspot.com/' ) ;
$ip = $_SERVER['REMOTE_ADDR'];
$hostaddress = gethostbyaddr($ip);
$browser = $_SERVER['HTTP_USER_AGENT'];
$referred = $_SERVER['HTTP_REFERER']; // a quirky spelling mistake that stuck in php

print "<strong>Display IP address:</strong><br />\n";
print "$ip<br /><br />\n";
print "<strong>More detailed host address:</strong><br />\n";
print "$hostaddress<br /><br />\n";
print "<strong>Display browser info</strong>:<br />\n";
print "$browser<br /><br />\n";
print "<strong>Where you came from (if you clicked on a link to get here</strong>:<br />\n";
if ($referred == "") {
print "Page was directly requested";
}
else {
print "$referred";
}
?> 

Step3

upload the php script to public folder

Step 4

Now send the link to your victim when the link is opened the IP address will displayed and stored

To view the IP Address

Replace your php link with ip.html
Example :
This is my Demo Link
http://crackthesec.my3gb.com/ip.php
replace as http://crackthesec.my3gb.com/ip.html
Read More...


Wednesday, 24 October 2012

How to hide Folder without any software using cmd

crackthesecurity | 08:57 | | | Be the first to comment!

Step 1

Open your command promt

Step 2 : To Hide

Now type attrib +s +h Path\Folder_Name
Eg : attrib +s +h h:\CTS

Step 3 : To UnHide

Now type attrib -s -h Path\Folder_Name
Eg : attrib -s -h h:\CTS
Note you can also view the hidden folder by


Click on YES and you can now see your hidden folder

You can also hide any files with their extension

Eg : attrib +s +h h:\CTS\a.jpg
Read More...


Tuesday, 23 October 2012

An Interesting Trick to Hide the Data in Notepad.

crackthesecurity | 00:11 | | | | Be the first to comment!

Steps to hide text in a Notepad

  • Open your command prompt
  • Type cd.. to move to C:\> drive or Type cd desktop to move to your desktop.
  • Type the below code in your command prompt
notepad filename.txt:hidden
  • Write some data and save (Ctrl+s) the file.
  • Browse to the file location and Open filename.txt you cannot see any data in the file.

To retrieve the hidden data open command prompt and type the same command.

>notepad filename.txt:hidden
Read More...


Monday, 22 October 2012

How to Hide your Secret Files inside an Image Without any Software

crackthesecurity | 06:15 | | | Be the first to comment!

NOTE: you must need two images and your files should be Compressed into .rar or .zip or anyother extension

Step 1

Open your command prompt

Step 2

Now Type the following commandline
copy /b [the_image] + [rar_file_to_hide] [image_result_name]
e.g : copy /b a.jpg + b.rar c.jpg
Now your a.jpg image & b.rar File will be copied inside the c.jpg

To view the hidden file open the c.jpg using winzip or winrar etc.

Read More...


Thursday, 18 October 2012

How to crash small websites using RDOS | DOS tutorial

crackthesecurity | 01:53 | | | Be the first to comment!

TOOLS REQUIRED:

NOTE: Use At your own RISK

You can Google the Tools above and download it and when you Download rDOS your antivirus may or may not detect the rDOS as a thread so if it Detects and delete it then try TURNING-OFF your Antivirus & Download it and then your IP Hiding Tool not to Trace you..

STEP 1

First of all you need to know the IP address of the website you want to crash.
Use ping command in windows to get the ip address of the website.
open CMD and enter ping www.website.com

Now you have the IP address of the website.

STEP 2

Now use Port scanner to check whether PORT 80 is open or not. If PORT 80 is not open choose another website to hack
otherwise you can crash this website.

STEP 3

 Now open your  rDos. Enter your victims ip that you got from step 1.
It will ask you for the port to attack use port 80 that’s why we scanned to make sure that 80 was open! If it is closed it will not work.
Read More...


Free online file converter

crackthesecurity | 01:17 | | | Be the first to comment!

How to Use this service

Go to www.online-convert.com and select the tool you want to use. Suppose i wish to convert an image to PNG format. Select the conversion and click on go.

Now browse the file or enter the web URL of the image. Select the quality settings and then click on convert.

After the conversion, you will find the download link of the converted file.

Download the file and enjoy. This is a nice online converter file which can be used any time from any where.
 
Read More...


How to Regain Access to your Hacked Facebook Account Easily

crackthesecurity | 00:48 | | | | | Be the first to comment!

Step 1

Visit http://www.facebook.com/hacked.

Step 2

Click My Account Is Compromised as shown in below screenshot

Step 3

Now enter your Email,Phone Or Username and Click on Search

And now identify your account & now click on continue without entering the password and then you will be redirected to another page as show in Step 4.

Step 4

Now choose your option to reset your password....

Read More...


Wednesday, 17 October 2012

How to Bypass CYBEROAM

crackthesecurity | 13:04 | | | | Be the first to comment!

TECHNIQUES TO BYPASS OR HACK CYBEROAM

USE TOR

  • Download TOR Browser
  • Install or Extract TOR browser in a portable USB drive.
  • Plug your USB drive in computer and start TOR browser and start surfing on Internet, Now all websites like FACEBOOK, ORKUT, BLOGGER are accessible.

CACHED HACK

This HACK work for all blocked websites. You can easily open blocked websites using this technique. When you search anything using google In the each search result there are two things in blue color prior to URL i.e Cached and Similar. To view that blocked Website You have to click on Cached Click on CACHED to access blocked websites.

PING HACK

There are millions of Proxy websites available on Internet. Find non popular proxy websites to open blocked websites. Then follow these steps
  • Start Command Prompt.
  • Type Ping www.proxywebsite.com
  • Copy IP address of that proxy website and paste into on you browser.
  • Your blocked website will be unblocked.

Note : Try to find non popular proxy website, there are lots of proxy websites available on Internet and not be able to cyberoam block all proxy websites from Internet so this hack will surely work if you find non popular proxy website which make fool to cyberoam.

HTTPS HACK

Try to find proxy website that uses https i.e. SSL proxies are also not blocked by any Cyberoam.
Read More...


Tuesday, 16 October 2012

How to Hide text behind images

crackthesecurity | 07:59 | | Be the first to comment!

Step 1

Copy an image file to (any Directory or Folder) of your computer.

Step2

Open  Command Prompt.

Step3

Note : Navigate to the Directory of your "image" stored. (Example : The image is in H:Directory then navigate to H: and then type

H:\>echo “your text to hide” >> “image.jpg”.

Step4

Now right click on image.jpg — Open with — Notepad. You can see your hidden text at the end of your image file contents.
Read More...


Saturday, 6 October 2012

Change View Mode of Magnifier in Windows 7

crackthesecurity | 05:23 | | Be the first to comment!
Windows 7/Vista has a very nice feature of MAGNIFIER (to Use press ‘WinKey’ and ‘+’) some times when we change the view mode to Docked, other views mode get disabled and in this tut I am going to let you know that how to enable those options.
1) Go into the Registry (Start -> Run -> type in Regedit and then click OK).
2) Navigate to the following key: HKEY_CURRENT_USER\Software\Microsoft\ScreenMagnifier
3) Under the MagnificationMode DWORD value, change that to either 2 or 3.
4) Close Registry Editor
5) Restart the Computer
Read More...


Resetting Ubuntu 11.10 Password

crackthesecurity | 05:16 | | Be the first to comment!
If you’ve forgotten your Ubuntu 11.10 Password you can reset it within minutes. I will tell you two methods to reset your Ubuntu Password. The first one is by booting it in recovery mode and second one is by using any Live OS.

Let’s start with the recovery mode first as it takes less time and easy to do in comparison to the second one method:

Boot up your Ubuntu. Press and Hold ‘Shift’ Key while the machine is booting. You will get the GRUB Menu like this:


Select the second option which is ‘Recovery Mode’ and press Enter. After pressing enter system will start booting and you will get a list of options like this:


After that we need to make the filesystem writable so that we can change the password. To make it writable select the 3rd option ‘remount’ and press Enter. After pressing enter you will get the following:


Press Enter here and you will get recovery menu with a list of options again:


Select the last option ‘root’ and press enter. If the root account password is not set then you will get a shell prompt like this:


Now you can enter commands to reset the password of any account.
#passwd <username>


Enter the new password and confirm it by entering again.
Now enter command ‘sync’.


Now Enter the command ‘reboot –f’ to reboot.


Now you can login with your new password.

Now if the root account is having a password then you will not get the shell at recovery mode. In this case you need to boot your ubuntu machine with any Live OS. I will be booting it again with Ubuntu 11.10.

Boot your machine with Ubuntu 11.10. You will get a screen asking to just try this as a live cd or install it on your machine:


Click on ‘Try Ubuntu’  to use it as a LIVE OS.

You will get desktop a live user.  Now you need to mount the file system to change the password. First we need to know the device name of the filesystem to mount. To get the name of device enter the command ‘sudo fdisk –l’


Now as you can see the system type of /dev/sda1 is Linux.
So we need to mount the device ‘/dev/sda1’.

To mount this device enters the following command.
#sudo mount /dev/sda1 /tmp


Now we need to enter the command ‘sudo chroot /tmp’  to get the shell on your filesystem:


Now we’ve got the shell we can change the password of any user by entering the command ‘passwd <username>’


Now restart the machine by entering the command ‘reboot’ and you will be able to login with your new password.
Read More...


How to Create your own Run Command ?

crackthesecurity | 05:10 | | Be the first to comment!
Step 1: Go to “Start,” “Run,” (told you we use it a lot) and type regedit.
Step 2: Navigate to the following:
HKEY_LOCAL_MACHINE\SOFTWARE\Microsoft\Windows\CurrentVersion\Apps Path
Step 3: Create a new folder/key under Apps Path. (Right-Click Apps Path and click “New,” “Key.”)
Step 4: Title the new folder/key the name of the application, e.g. firefox.exe.
Step 5: Right-Click the default string value (the thing automatically created in your new folder) and click Modify.
Step 6: Change the value to the path of the executable you are attempting to run. E.g. C:\Program Files\Mozilla Firefox\firefox.exe.
Step 7: Create a new “String Value” by right-clicking under the default value (the thing we just edited) and select “New,” “String Value.” Name it Path and enter the value as the same path you previously entered.
Step 8: Done! Now, all you need to do is go to “Start,” “Run,” and type the name of your command!
Read More...


How to Send Data on a Right Click to Your Desired Folder?

crackthesecurity | 05:08 | | Be the first to comment!
Whenever you attach a removable disk and want to send some items in it, you have option either you select the required files and do a CTRL –C, open the removable disk and do a CTRL-V or you select the required files right click on it and there you find “Send To” option. In “Send To” you find the name of removable disk and you simply send the items into it. Well, What if i get the name of my own desired folder there which I use frequently for keeping my stuff.

Now in this post I will be telling you how you can create your own folder with in any name in “Send To” option so that whenever you will copy any files or folders, you will simply send them to your folder instead of using CTRL-C and CTRL-V.

1)     Firstly you’ll have to access hidden files. So change your view settings to make all hidden files visible.
Tools -> folder options -> view (tab) and select the show hidden files and folders.

2)     In Windows 7 also you will have to unmark “hide system protected files and folder”. After that you can see all the hidden system protection file, now go to
C:\Users\UserName\SendTo folder.

3)     Open up my computer and locate your most used folders let us take “Fun”. Create a shortcut of the most used folders (Fun) in
C:\Users\UserName\SendTo folder.

4)     You can do this in a number of ways.
Right click -> send to desktop (create shortcut) and move the shortcut from the desktop to the C:\Users\UserName\SendTo folder.
Copy the most used folder and go to C:\Users\UserName\SendTo folder and right click -> paste shortcut.

5)     Now your customized “Send To” option is ready to go.
Read More...


Secure your Computer by Sticky Key Attack

crackthesecurity | 05:06 | | Be the first to comment!
Windows XP:
  1. Check for sticky key backdoor “By pressing sticky key  5 times on login screen ”  whenever  you turn on the computer.
  2. Turn off the sticky Keys .
  3. Or you can use this step to disable the ‘net user’ command, so that if anybody make a backdoor  in your system but he can’t change your password .
    1. Open the folder c:\windows\system32
    2.  Search for ‘Net.exe’ over there and replace it with ‘cmd.exe’ or with any other ‘.exe’ file.
    3. Open the file by inserting this address c:\windows\system32\dllcache on file browser manually and change the ‘net.exe’ with ‘cmd.exe’ or any other ‘.exe’ file.
Windows 7:
  1. Check for sticky key backdoor “By pressing sticky key  5 times on login screen ”  whenever  you turn on the computer .
  2. Turn off the sticky Keys .
  3. Or you can use this step to disable the ‘net user’ command, so that if anybody make a backdoor  in your system but he can’t change your password .
    1. Open the folder c:\windows\system32
    2. Search for ‘Net.exe’ over there and replace it with ‘cmd.exe’ or with any other ‘.exe’ file.
    3. Open the file by inserting this C:\Windows\winsxs\x86_microsoft-windows-net-command-line-tool_31bf3856ad364e35_6.1.7600.16385_none_5208a7a3d3caa54c on file browser manually and change the ‘net.exe’ with ‘cmd.exe’ or any other ‘.exe’ file.
Read More...


How to Hide a folder without any third party Software

crackthesecurity | 04:51 | | | | Be the first to comment!


To Hide:
Rename any folder with extension
{645FF040-5081-101B-9F08-00AA002F954E}
For eg,
If u’ve a folder with name “abc”
press F2,
then type,
abc.{645FF040-5081-101B-9F08-00AA002F954E}
and Press Enter.

To get back to its original form :
Make a new batch file with any name and type
ren abc.{645FF040-5081-101B-9F08-00AA002F954E} abc
and save it as abc.bat
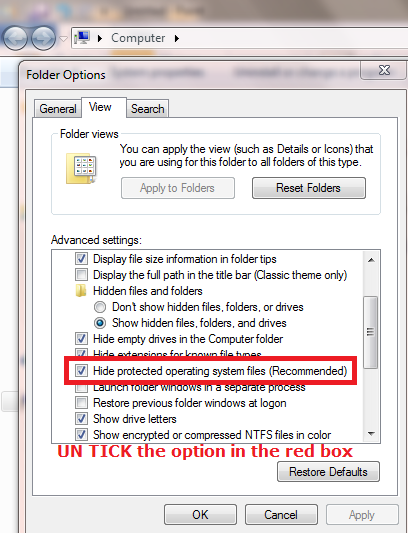
Read More...


How to access blocked sites or country restricted sites

crackthesecurity | 04:17 | | | Be the first to comment!
Stealthy allows you to instantaneously get and setup a working proxy from a click of a button.
If you are worried about the permissions required by the extension check out this certificate: http://www.softpedia.com/progClean/Stealthy-for-Chrome-Clean-215173.html
Does your country/company blocks you out of facebook, youtube or others?

Stealthy is the solution for you.

  • Hide your IP address for your privacy online.
  • Access all content privately without censorship; bypass firewalls.
It provide the proxies, so you don't have to bother searching for lists that usually don't work. The extension automatically selects and sets up tested proxies from the cloud.

The term Stealthy refers to military aircraft that can penetrate into enemy territory undetected by radar. In a way, that’s what this browser extension does.

Some organizations and governments block access to web pages, and certain online services are not available in all countries. With Stealthy, users can make themselves undetectable, and thereby able to bypass the censorship.

This can be tremendously important in countries like China or Iran, where regimes censor the Internet. But even in countries like Germany, many people cannot watch music videos on YouTube because of a licensing dispute with GEMA. With Stealthy installed, this is not an issue, as you can get a foreign IP address and play the videos without issue.

Once installed, a small stealth aircraft icon will be appear in your navigation bar. The color is red by default, indicating Stealthy is off. After clicking on it, Stealthy automatically searches for an appropriate proxy, sets up your browser, and turns the icon green, meaning you are now in Stealth mode.

How does it works:
The extension works by placing an icon on the upper right part of your browser, after installation Stealthy will be off by default, you will need to turn it on. With the click it switches between ON (green icon) and OFF (red icon), in the (unlikely) case that the proxy assigned to you doesn't work or is too slow you should turn Stealthy off and on again in order to get a new one.
Configuration:
This is the preferences window, you access there by clicking on the small arrow in the right side of Stealthy's icon.

Yo can chose between uses:

  • Normal use for achieve anonymity
  • Pretend that you are in the US
  • Use a service that requires you to be in an specific country by providing the country code.
You can also chose the behavior on start-up:
  • Leave it as it was previously set
  • Automatically set it Off
  • Automatically set it On.
The last option cleanup your network settings in case you lost connectivity to internet, or Stealthy refuses to work


Read More...


Sunday, 8 April 2012

How to use Joomscan? (for Linux – BackTrack 5)

crackthesecurity | 04:52 | Be the first to comment!
First of all we download files: http://web-center.si/joomscan/joomscan.tar.gz


Then we copy files in directory /pentest/web/scanners/joomscan/.


Now you have to set CHMOD 777 for file joomscan.pl with command: CHMOD 0777 joomscan.pl


After that we have to learn how to update the data base:


You can update joomscan with command: ./joomscan.pl update

   
After we updated the joomscan, we can use for scanning our websites:
Type ./joomscan.pl -u www.site.com and hit enter:


Wait for couple minutes and you will get the result.
Read More...